Whilst I was feeling a little crafty I decided to make another fabric covered pin board. These are quite easy to make, don't take much time at all and I think make perfect gifts for friends and loved ones. This time I thought I would take photographs as I go to share with you how you yourself could whip one up....
Gather your ingredients:
Cheap pin board ( mine came from Tesco )
( Pretty ) Fabric to cover front of board with spare to fold over the back edge to staple
Wadding to cover front of board with spare to fold over the back edge to staple
Ribbon
Drawing pins ( I used map pins )
Tacks/pins and string to hang ( optional )
Fabric glue and calico/similar ( If you want to cover the back )
Staple Gun
Measurements of fabric and ribbon etc shall of course depend on what size pin board you have, mine measures approximately 16 x 24 inches. So, I think it is time for some photographs yes?
One rather bland looking pin board....

Measure enough fabric ( I used my prettiest Greengate fabric ) and wadding to cover the front and also to fold over the edges....

Then fold over an equal amount all the way around the pin board, pull quite taut and staple in place....

You really don't have to make it look too neat and tidy as this shall be the back and like me you can always cover it up with some calico or similar fabric. Once you have finished stapling gather your ribbon....

As I was using my ribbon from a roll I just roughly measured and cut to size as I went. So measure out your first X mark with ribbon going from one corner to the other....

And then staple in place at the back....

Continue with the stapling of your ribbon. You can be super accurate and measure out even gaps in between each length but for me I just measured roughly as I went. I also found it worthwhile popping a pin at each cross point on the edges of the pin board to keep the ribbon safely in place and you don't notice them when you have finished....

You should then finish with something that resembles this. Pop your drawing pins/map pins carefully in place and be careful too as the sharp point can pop through to the back if you push to hard, I just flattened the backs with a hammer.....
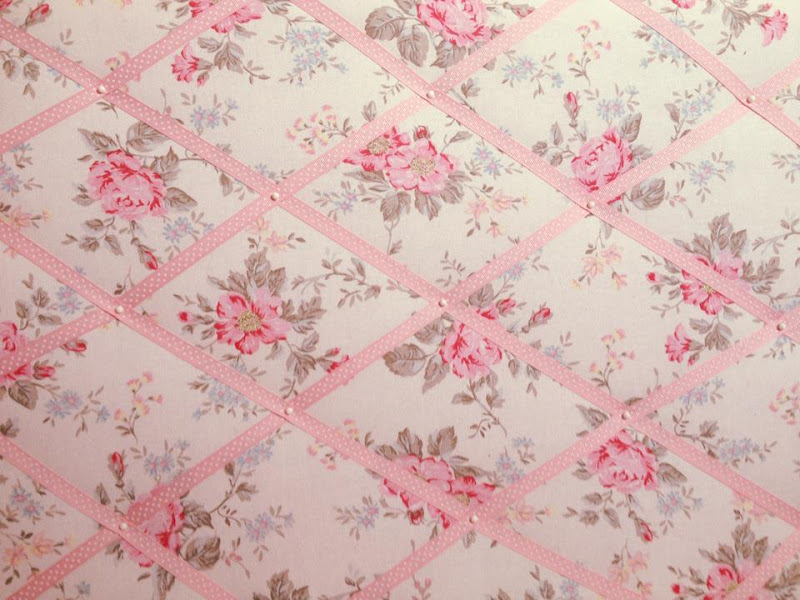
Pretty huh, you can then choose whether you want to cover the back for a tidy finish....

You can display your pretty things horizontally or vertically....

Oh hang on, we need some pretty things....

I would love to know if you make one, do come back and let me know if you do :)
X
Looks fab i must get around to making one of these for my daughter to hang her rosettes on.
ReplyDeleteThanks Jane! Ah yes it would look super with lots of colourful rosettes on, very pretty :) x
DeleteLove it, I have the same pin board and wanted a fabric one, so some day I may make one of these, thanks for sharing
ReplyDeleteAll things nice...
Hope you get round to it soon, really doesn't take too long to make and do look all pretty when finished :) x
DeleteI love this, all Greengate is fantastic and this fabric is so pretty. I made a notice board from MDF and it was really difficult to hammer or staple into, MDF is surprisingly hard, this is a much better idea, I'm def going to have a go. Thanks, Karen x
ReplyDeleteYes this is quite easy to staple into, and a very quick project really, I think laying the ribbon in place took the longest. Good luck with yours and let me know as would love to see it :) x
DeleteGreat tutorial, and I love the pretty pinboard you've created here. What a nice idea to makes something so much prettier from the plain and simple board and be able to choose your own favourite fabric too.
ReplyDeleteHelen x
Thanks Helen, I think choosing which fabrics to use in home projects is the hardest part ;) Happy crafting, just adore your pretty makes! x
DeleteAmazing tutorial! The pin board is just gorgeous!
ReplyDeletexx
Thanks Isobel, I need to have pretty things around me to make me smile :) xx
DeleteThis comment has been removed by the author.
ReplyDeleteHi, I just used your tutorial to make my son a pinboard for his room. I folded a dark blue sheet over and stapled it together on top of the board. I used white ribbon and it looks great! Thank you.
ReplyDeleteHi, I made one of these for my sister using your tutorial, got some white material with blue stars to match her Emma Bridgewater Biscuit Tin I have bought her for christmas, then some dark blue ribbon it looks great. Thanks x
ReplyDeleteJust made my 1st o e of these for my daughters room. Really quick and easy and it looks really pretty. I bought my board from ikea which was only £3.10 which makes project really affordable.
ReplyDeleteThanks
I've just made one of these for my kitchen using a cheap artist's canvas from Wilkinson's instead of a pin board - the chunkier frame was very easy to staple. A lady at a local monthly craft market sells these for £20 - mine cost a fraction of this as I had a pretty off-cut of material and wadding left over from a quilt project.
ReplyDeleteI am inspired, I have an ugly pinboard that will now be transformed this weekend! Just have to find some cute material...!
ReplyDeleteMy boyfriend and I just made one and it looks fab! Thanks for your help! :)
ReplyDeleteThank you so much - just followed your instructions to make a pin board for my daughters birthday :-)
ReplyDeleteThanks! I am looking for fabric to make a table runner, and thought something like this would be perfect to match in the kitchen! The plain old boring pinboard is currently swamped with notes too - so I think a lovely pretty one will also encourage me to be a bit more neater too!
ReplyDeleteGreat idea and soooo easy to do! Just finished mine and couldn't be more pleased :)
ReplyDeleteThank you I have just made one and it looks great!
ReplyDeleteThank you for another great article. Where else could anyone get that kind of information in such a perfect way of writing? I have a presentation next week, and I am on the look for such information. wholesale fabric
ReplyDeleteWhat thickness wadding is best to use
ReplyDelete