Showing posts with label Makeovers. Show all posts

Friday, 20 June 2014

Party Decorations, Celebrations, Makeovers & More

Well hello there!

I thought it high time I got my feet back on the blogging pedal, post some pretty photographs and let you know what we've all been up to in the Poppins household. We have been gearing up for a little occasion where little Miss. Poppins got to be queen for a day. I got to relish in all things floral and girly so had great fun organising things. Here's a little taster of her beautiful bouquet.


I organised a little get together for her friends and ours, and made some pretty decorations to create that party atmosphere. Here I threaded some cheap cupcake cases along a length of twine, so easy and quick to do.


They look so effective when hung up, like pretty cupcake bunting. Of course I couldn't resist having a go at making some paper pom poms. My new making craze and they looked lovely in the gazebo, they are now dotted all over the house, perfect for summer! Seriously if you have ever thought about making these, do it, they are SO easy and quick to make. There are lots of great tutorials out there so have a search. 


 These ones came out lovely and big, and at only 49p for 10 sheets of coloured paper from Home Bargains, a bargain too! I also made up some sweet heart bunting using pairs of heart shaped paper doilies to create a 3D effect. Cute, cute, cute!


As is tradition for the festival Miss Poppins was in, the Queen's home is decorated near to the crowning day, and I had fun playing with pretty flowers. I was kindly given some really lovely artificial flowers and Poundland came up trumps ordering in some of their £1 hanging buckets that I had been trying to get hold of. I placed little posies in each of the 12 buckets and popped them along the garden fencing. I just love the pretty look!


As we were having little tables outside for people to sit around I wanted to have a little decoration on those too, so I dug out some of my pretty (and pink) stuff and thought about what I could do.


With the pretty polka dot Ikea candles I couldn't resist adding a little bling!


And with the other candles I used doilies and ribbon, which I thought looked rather sweet on the tables. The LED ones again from Poundland are great and give off a glow with just the switch of a button.  


You can't have a little party without balloons and being helium, needed weighing down. Hmmm, I may as well make the weights!


Pimms was served in the oh so cool Ikea flamingo glasses that I have slowly been 'collecting'. I may be a little embarrassed at how many I now have, I tend to put a small handful in the trolley each time I visit Ikea ;) My thinking being they make perfect little tea light holders too amongst many other things.  


And so a lovely little party was had and soon morning came and it was Miss. Poppins' big day. She had a ball and I was the proud mum of her and also Master Poppins who was a dancer in the festival. My very own Billy Elliott! Here she is, looking very regal and the horse drawn carriage was just divine!


She made a lovely speech in front of an audience and hopefully relished every moment. A lovely day and a memory for her to hold on to.  So her beautiful handmade (not by me but a very talented dressmaker) dress is hung up, waiting to be put on again for her duties as 'Queen' and of course sticking with the handmade theme, even the hanger is a little crafty make.


Next it was time to finish my long list of little makeover's. I managed to acquire a semi-circular garden bench that is meant to go around a tree. The item was gifted and I couldn't wait to get stuck in and pretty her up. She was rather rusty and looking a little unloved when I first got her. Here she is all dismantled, two of the 'chairs' have been primed ready for a top coat. I just hoped I could remember how to put her all back together again!


After a lengthy painting session and some detailed remembering of where bits and pieces go, I got her back all in one piece. Adding a little pink rose garland could only make her even more charmful. Hope you like the new her!


 Next it was finishing Master Poppins little bedside table in his room. You may remember it looked like this.


And now it looks like this.


I've distressed it a little so it gives off a nice vintage vibe. Mr. P knowing my love of all things old, knew I'd take a fancy to an old little wooden crate he found in a skip - being a gentleman he asked and it was kindly given. I got my trusty paintbrush out and love the white washed look a light coat of paint has given it and you can see all that lovely grain.


Soon it was time for the sewing machine to come out again. Here's what I been 'a making!

Pretty lavender keyrings.


Cowboy personalised bunting.


 Oh so pretty 'With Love' hearts.


I'm really enjoying making word prints as gifts for people and I loved doing this one and making a little heart for a very special new baby boy.


So hopefully a little glimpse into our little world. 

I couldn't leave you without sharing a little number I picked up a while ago, second hand, but great condition and possibly a bit of a bargain. A really lovely Cath Kidston Classic Rose eiderdown in blue. It made a perfect gift for Miss. Poppins to cosy up in, I just really hope she shares it with her mamma!!


^^^^ Oh I love it! ^^^^

X

Monday, 24 February 2014

Happiness Is Homemade

Well hello lovelies! I thought I would share a little of what I have been up to. I have definitely come to realise I get much more happiness making or re-loving an item for my home than buying something shop bought, and that has most probably come off a factory line. I think it is so special to have handmade elements around the home, and every week I now make it my aim to get creative, and make at least one little something to help bring some extra homemade happiness. One make I've done recently and which actually is a make'over' is this very useful storage ottoman. I am a big fan of Freecycle and this is where it was kindly given to me. It was looking just fine but I knew I wanted to give it a cover more in keeping with my own decor. 

   
To be honest this started off in my head as something I thought I could do quite quickly and easily. Ha Ha what was I thinking! Difficulty level wise, this wasn't too bad but my staple gun and I just didn't get on at all on this project. In the end I just stapled on a new top cover after removing the old one and then got the sewing machine out to make a loose skirt style bottom for it. I used one of my favourite Laura Ashley gingham fabrics and Rosali for the inside lining. 


I was really happy with the end result and this makeover certainly was a labour of love - removing hundreds of old staples that seemed to take forever is not my idea of fun ;) But all worth it in the end, and I think the skirt style cover for the bottom really works!


My next little project involved this old music sheet book. 


 I busily got on with cutting out many heart shapes...


And after popping them into pairs, and sewing a length of thread all the way down their middles, I ended up with a pretty heart garland. This project had been on my to do list for longer than I can remember, it took so little time to make and I can't wait to get on and make more and perhaps using different materials. 


I'm also trying to source things I already have around the home to make new things, and so next time I'm going to make some pretty bunting using some of my many paper doilies I have in the cupboard. 


I can't wait to finish it and see how the bunting looks.


I am way, way way behind on this one. But only now have I jumped on the pom pom craze and with the help of these little pom pom makers am able to churn out many on the go. 


 I can't get enough of making these pretty little balls of fluff.


Back to Freecycle, I again have been given some wonderful free items and this is my most recent favourite, a little dressing table stool. Exactly what I needed and all ready for a little sprucing up!   


So hopefully these little homemade touches really do bring happiness, I know when I see something homemade in peoples homes it really does bring a big smile to my face :)


Happy making!

X  

Tuesday, 1 May 2012

One Unfinished Job Finished

I wonder sometimes why I am absolutely fantastic at starting little makeovers/jobs etc around the home, yet am absolutely rubbish at finishing them. Please tell me I am not the only one who has this trait. Take Master Poppins' feature wall in his attic bedroom. I was brilliant at getting the Cath Kidston wallpaper out and started wallpapering with gusto and enthusiasm. As the room has a round window in it, it became quite a difficult task getting past that window, lots of workings out and careful cutting. If any of you have ever wallpapered around a round window, you shall understand. Anyway a couple of widths before the end of the wall I just flaked out and had had enough. Yes I know, why give up a job nearly done, daft isn't it. But there we are.

Anyway he has had a big gap behind his bed for longer that I wish to admit, until today. As he was relaxing on the couch as he is off school under the weather with a bad cough I cracked on, mixed my paste, cut two lengths of wallpaper to size and did it. I actually finished the job I had set out to do yonks ago. It looks so much better and of course I am cross I didn't finish it sooner, as it really didn't take long at all....


Now to crack on with the other trillion things left unfinished ;)

X

Friday, 23 March 2012

Weather For Painting Or Playing?....

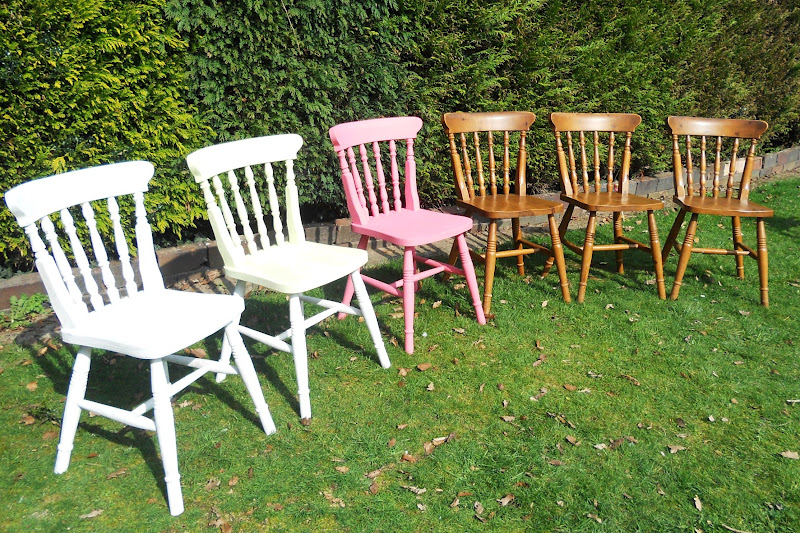
A little while ago I found these lovely chairs via freecycle. I got the paint brushes out and made a start on prettying them up....


Then as the weather got colder I put the paintbrushes away. I woke up today, with the sun shining brightly and I thought today is the day I shall get those paintbrushes out again along with the little tester pots of colour I am going to use to paint the chairs....  


I like to be as thrifty as possible so happily picked these up for £1 each from Wilko's and shall be mixing with a little white to make the paint go further for each chair. I love the shabby chic look when it comes to my home décor, and once an item of furniture has been primed that I am making over, I often use emulsion rather than satin wood as a top coat, sand where appropriate, and then wax on top for an authentically worn in look. Of course there is always someone who wants to play and interrupt my painting....


So, here is where we are up to....


One primed, one apple green half finished, one raspberry pink pretty much finished, and three yet to get going on. Hmmm methinks I prefer playing rather than painting ;) Though I am on a mission and hoping to get them done by dusk. We shall see....

X

Tuesday, 7 February 2012

Vintage Trunk....

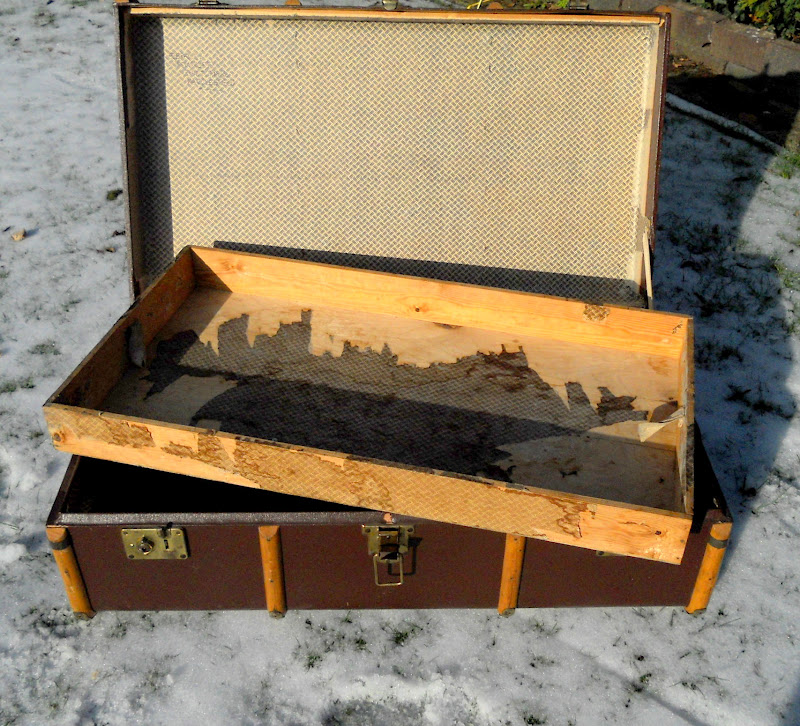
Oh I really do love old, vintage things with character and charm to them, and when I spied this lovely trunk, I knew I had to have it. Normally these old vintage trunks can be quite pricey, though this I thought quite reasonable, so I snapped it up....


 I love the well worn leather handles....


And the rusty locks....


The inside isn't quite as pretty, but I am hopefully going to sort that out....


The lining is a very fine paper one and I just love the removable top drawer that came with it. Sadly the original paper was quite badly water damaged so I have already started picking away at the lining, ready to replace it with something pretty....


I just love the way the drawer sits neatly on top....


So, all I need to decide is how to go about lining it and what to use. Lining paper? Wallpaper? Fabric? I am yet to make up my mind. I can send it off to the professional peeps, but you know me, I always like to give things a go. Oh and then I also need to think about what treasures I want to keep inside it. Hmmmm it could be a trunk full of all those special memories of having children, their first blanket, name tags, special outfits those kinds of things....For now is on my endless list of jobs to do, if you can offer any tips on how you would line it, would love to know :)

X

Friday, 23 September 2011

Pretty Makeover, Part 2....

Do you remember this lovely little piece of furniture I bought for £5 and wanted to give it a makeover....Well here she is, all madeover. I searched in my fabric pile for a suitable fabric to cover the top, and used some nice new wadding so it also makes a very lovely and very comfy seat too. I really do think I chose well in the floral fabric, as soon as I popped it on the top of the chest to see if it would work, it looked and felt right, just the right amount of floral busy-ness, and the pretty colours are divine.


As for the painting...well certainly a spray job for my next Lloyd Loom project methinks, lost count of how many coats I used, and I do like the piant to go in all those little gaps....


I made a little fabric thingy to help lift up the lid and popped some pretty cream braid around the edges of the padded seat....


And decided to pretty up the inside of the lid too, so covered it with some Laura Ashley pink gingham and used some very jazzy gold braid to edge it....


Ah, I think she looks really cute....


And even cuter with some of my pretty bed linens sitting nice and snug inside ;)


Oh, I do love a good makeover, infact I would really would to present my own little shabby chicy makeover-y type programme on the television, or a little slot on This Morning!! Ha, a girl can dream can't she....

X